Wiring diagram of a car radio: understanding the colors of the wires
Connecting a car radio is a delicate operation, especially if you are a novice in the field. It is essential to know the different functions of the wires and their colors to carry out the installation correctly. In this article, we offer you a detailed guide on the wiring diagram of a car stereo as well as the meanings of the colors of the wires. You will also find out how to connect the speakers and the box.
General operation of a car radio
A car radio is made up of a set of cables and connectors which allow it to be connected to the various elements of your vehicle, such as the speakers, the power supply, the aerial, etc. In general, these cables are grouped into two main groups:
Power cables
audio cables
To make the connection process easier, car stereo manufacturers use color codes to identify the function of each wire. Thus, you will only need to connect the wires of the same color to ensure the proper functioning of your car radio.
Understanding car radio wire colors
Here are the main colors of the wires of a car radio as well as their meaning:
Power wires
Red wire: this is the main power wire (+12V). It must be connected to DC battery power. This wire provides power to your car radio and keeps the settings (time, radio stations, etc.) even when the vehicle is off.
Yellow wire: This is the switched power wire (+12V). It must be connected to an electrical element that only works when the ignition is on, such as the dashboard, for example. Thus, your car radio will turn on automatically when you start your vehicle and turn off when it is turned off.
Black wire: this wire corresponds to the mass (-12V), also called Ground. It must be connected to a metal part of the car's chassis to ensure a good connection to the vehicle's electrical system.
Note that some cars are equipped with different wiring, especially if they have a steering wheel control or an original amplifier. In this case, specific adapters may be necessary to ensure compatibility between your car radio and the original harness of your vehicle.
audio wires
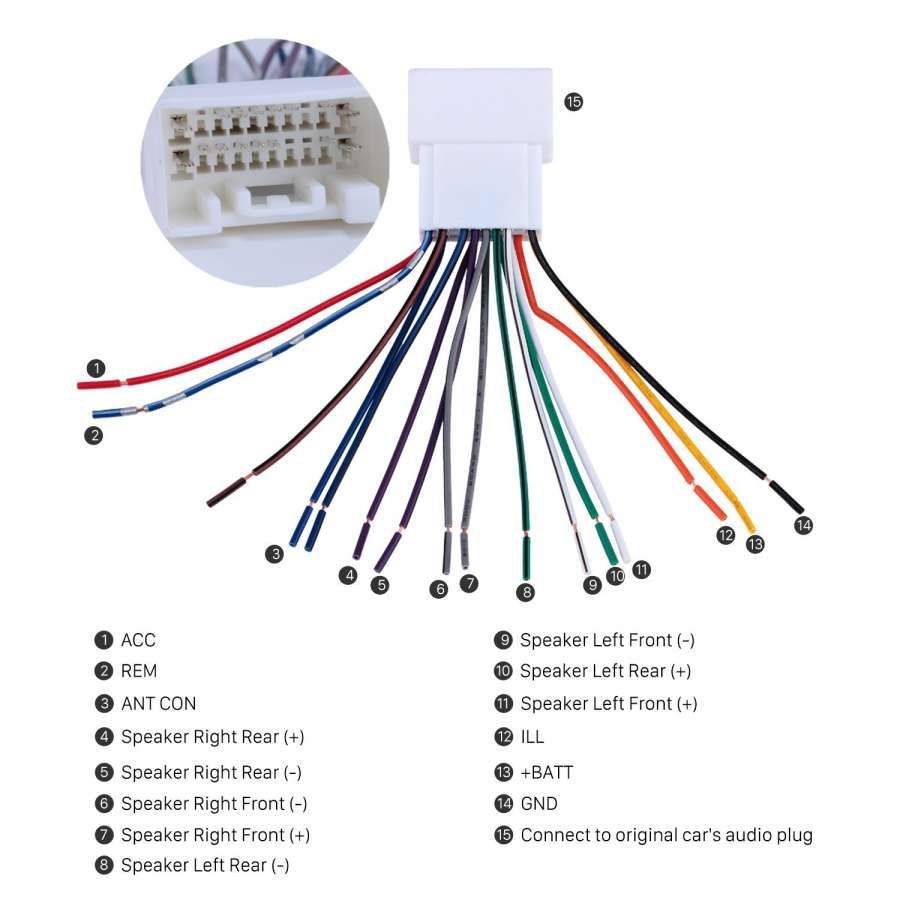
Audio wires are used to transmit the sound signal between your car radio and your vehicle's speakers. They are generally identified by two colors: a main color and a secondary color (often, a line of this secondary color runs through the main thread). The main color indicates the position of the speaker (front or rear, left or right), while the secondary color indicates whether it is the positive (+) or negative (-) wire.
Here is the standard color code for audio wires:
White wire: left front speaker (+)
White wire with black line: left front speaker (-)
Gray Wire: Right Front Speaker (+)
Gray wire with black line: right front speaker (-)
Green wire: left rear speaker (+)
Green wire with black line: left rear speaker (-)
Purple wire: right rear speaker (+)
Purple wire with black line: right rear speaker (-)
Connect the car radio
Once you have identified the different wires and their function, you can connect your car radio. Here are the steps to follow:
Disconnect your vehicle's battery to avoid any risk of a short circuit.
Remove the original car radio by disconnecting its wiring harness and aerial.
Connect the power wires of your new car radio to the corresponding wires of your vehicle's wiring harness, respecting the color codes. You can use quick connectors or dominoes to make these connections.
Connect the audio wires to those of your car speakers, again making sure to respect the color codes.
If necessary, connect an antenna adapter to connect the car radio to your vehicle's antenna.
Install the box of your car radio in the location provided for this purpose and secure it securely.
Reconnect your car battery and test the operation of your car radio (ignition, radio reception, audio quality, etc.).
By following these steps and scrupulously respecting the color codes of the wires, you should be able to connect your car radio without difficulty. Do not forget to consult the user manual of your equipment to know its specificities and possibly adapt the connection diagram presented here.
In the event of an error message when switching on or a request for the Renault car radio code or Renault authentication code, discover online services.
Connecting a car radio requires special attention to avoid any malfunction or damage to your equipment. By understanding wire colors and their functions, you will be able to do this safely. If you are having difficulty or if you are unsure of the compatibility between your car radio and your vehicle's wiring harness, do not hesitate to call on a professional to carry out the installation.
Wiring diagram of a car radio: understanding the colors of the wires
Connecting a car radio is a delicate operation, especially if you are a novice in the field. It is essential to know the different functions of the wires and their colors to carry out the installation correctly. In this article, we offer you a detailed guide on the wiring diagram of a car stereo as well as the meanings of the colors of the wires. You will also find out how to connect the speakers and the box.
General operation of a car radio
A car radio is made up of a set of cables and connectors which allow it to be connected to the various elements of your vehicle, such as the speakers, the power supply, the aerial, etc. In general, these cables are grouped into two main groups:
Power cables
audio cables
To make the connection process easier, car stereo manufacturers use color codes to identify the function of each wire. Thus, you will only need to connect the wires of the same color to ensure the proper functioning of your car radio.
Understanding car radio wire colors
Here are the main colors of the wires of a car radio as well as their meaning:
Power wires
Red wire: this is the main power wire (+12V). It must be connected to DC battery power. This wire provides power to your car radio and keeps the settings (time, radio stations, etc.) even when the vehicle is off.
Yellow wire: This is the switched power wire (+12V). It must be connected to an electrical element that only works when the ignition is on, such as the dashboard, for example. Thus, your car radio will turn on automatically when you start your vehicle and turn off when it is turned off.
Black wire: this wire corresponds to the mass (-12V), also called Ground. It must be connected to a metal part of the car's chassis to ensure a good connection to the vehicle's electrical system.
Note that some cars are equipped with different wiring, especially if they have a steering wheel control or an original amplifier. In this case, specific adapters may be necessary to ensure compatibility between your car radio and the original harness of your vehicle.
audio wires
Audio wires are used to transmit the sound signal between your car radio and your vehicle's speakers. They are generally identified by two colors: a main color and a secondary color (often, a line of this secondary color runs through the main thread). The main color indicates the position of the speaker (front or rear, left or right), while the secondary color indicates whether it is the positive (+) or negative (-) wire.
Here is the standard color code for audio wires:
White wire: left front speaker (+)
White wire with black line: left front speaker (-)
Gray Wire: Right Front Speaker (+)
Gray wire with black line: right front speaker (-)
Green wire: left rear speaker (+)
Green wire with black line: left rear speaker (-)
Purple wire: right rear speaker (+)
Purple wire with black line: right rear speaker (-)
Connect the car radio
Once you have identified the different wires and their function, you can connect your car radio. Here are the steps to follow:
Disconnect your vehicle's battery to avoid any risk of a short circuit.
Remove the original car radio by disconnecting its wiring harness and aerial.
Connect the power wires of your new car radio to the corresponding wires of your vehicle's wiring harness, respecting the color codes. You can use quick connectors or dominoes to make these connections.
Connect the audio wires to those of your car speakers, again making sure to respect the color codes.
If necessary, connect an antenna adapter to connect the car radio to your vehicle's antenna.
Install the box of your car radio in the location provided for this purpose and secure it securely.
Reconnect your car battery and test the operation of your car radio (ignition, radio reception, audio quality, etc.).
By following these steps and scrupulously respecting the color codes of the wires, you should be able to connect your car radio without difficulty. Do not forget to consult the user manual of your equipment to know its specificities and possibly adapt the connection diagram presented here.
In the event of an error message when switching on or a request for the Renault car radio code or Renault authentication code, discover online services.
Connecting a car radio requires special attention to avoid any malfunction or damage to your equipment. By understanding wire colors and their functions, you will be able to do this safely. If you are having difficulty or if you are unsure of the compatibility between your car radio and your vehicle's wiring harness, do not hesitate to call on a professional to carry out the installation.


No comments:
Post a Comment